Luke and I made chili the other day and it turned out wonderful. We kind of went off another recipe that we found for some of the main things, but did a lot on our own.
1 lb - Ground Beef
1 - 16oz can Bush Chili Beans (mild)
1 - 15 oz can Tomato Sauce
1 - 10oz can Rotel Diced Tomatoes and Green Chilies
1 - 14.5oz can Huntz Petite Diced Tomatoes
1 - 16oz can Bush Kidney Beans
1 - Chopped Green Bell Pepper
1 - Medium Sized Chopped Jalapeno Pepper
1/2 - Chopped White Onion
2 Tsp - Garlic
2 Tbsp - Brown Sugar
1 Tbsp - Cumin
2 Tsp - Oregano
1 1/2 Tbsp - Chili Powder
1/2 Tbsp - Cayenne Pepper
Salt
Black Pepper
In a frying pan, brown the beef. I added a few shakes of black pepper and salt, then added in the tomato sauce and set to the side.
In a separate frying pan, saute the onions, garlic, brown sugar, cumin, oregano, chili powder, cayenne pepper, chopped jalapeno pepper (de-seed), chopped green bell pepper until the onions become translucent.
In a slow cooking crockpost, combine the contents of both pans along with the remainder of ingredients (Bush Chili Beans, Rotel Diced Tomatoes and Green Chilies, Bush Kidney Beans) . Slow cook for 8 hours.
We did our overnight and let it cool off in the morning. Then when I got home from work, we heated it in the crockpot again for dinner. It does have a bit of spice to it, but it's not too hot. If you want it hotter, use either Hot or Medium Bush Chili Beans instead of mild. If you want it cooler, leave out the jalapeno.
All in all, we were very impressed and wrote down the ingredients right away... so we can make it again!
Tuesday, August 23, 2011
Saturday, August 20, 2011
A Gift to Always Be Thankful For
Well, yesterday was the 4 year anniversary of my father having a heart transplant. I can't believe how fast time has flown by. I am so indifferent with my emotions when this day comes. I am so very, very grateful of this gift of having a second chance at life for my dad. But, I am so deeply saddened for the other family's loss. I only hope they know how much this has given us, and how much we grieve for them as well.

Here's to my dad, one of the most influential men in my life and those who lost a loved one and was so selfless to help others. I am so thankful you are happy and healthy again.

Here's to my dad, one of the most influential men in my life and those who lost a loved one and was so selfless to help others. I am so thankful you are happy and healthy again.
Saturday, August 6, 2011
Painting My Sister's Room
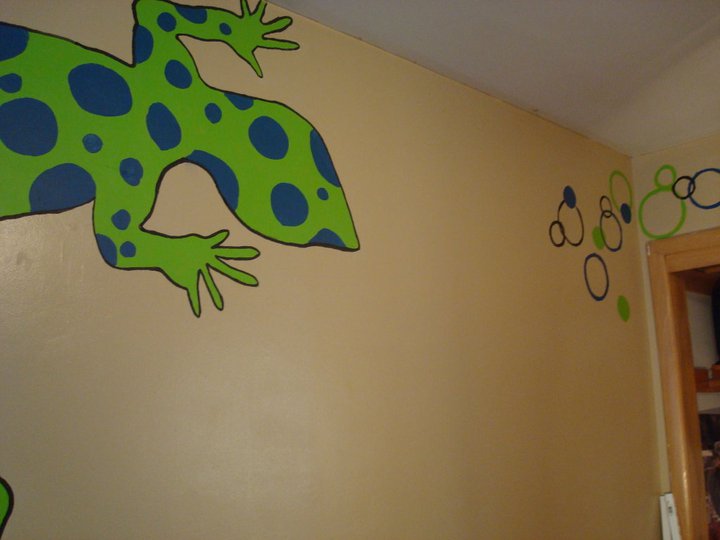
Well, my sister has been an ambitious little thing lately. She started packing up the kitchen stuff and peeling the wall paper to repaint. Then she decided she was tired of her room and needed a change. I went down and visited for a day and I helped her to get started on a design. This is what she decided she wanted: a gecko.


This is the finished product
And here are the in progress photos:

Before

Here is Amanda drawing the circles on the gecko. I found that using chalk on the wall is wonderful! It erases so easily with just your hand! No pencil marks!

Amanda drawing more circles, see the ladder? So helpful when you are vertically challenged. :)

One coat on two more to go before I get to paint in the circles!

I wanted to continue with the circles on the wall like on the gecko, so Amanda found a ton of different sizes of circles to trace with the chalk.

Amanda painted the circles while I painted the gecko.

I helped paint some of these circles. Amanda started getting frustrated. But, man... circles are hard to paint and make it look good! Amanda did a great job!

What it looks like now, I think she's still going to work on smoothing out some of the edges.
A little snipit of both!
I just have to say, that I had a wonderful day spending some quality time with my sister. I'm so glad I took the day to go visit. :)
Monday, July 11, 2011
Dale Chihuly Pop Bottle Sculpture in Detail
I have had a few requests on further explaining how I made the pop bottle sculpture. I took some time to draw out a better detail. I would rather draw it considering I am a visual learner and explain things better when I have a diagram or objects in front of me. :P
Here you are! Click on the picture to make it bigger. After I started gluing, I worked my way up the tube with the pop bottles using the longer cut tubes toward the bottom and the shorter tubes at the top. I think this made it look more full. More pictures are in a slideshow here on a previous post I did.


Here you are! Click on the picture to make it bigger. After I started gluing, I worked my way up the tube with the pop bottles using the longer cut tubes toward the bottom and the shorter tubes at the top. I think this made it look more full. More pictures are in a slideshow here on a previous post I did.


Friday, July 1, 2011
Drawing with Chocolate
Well, on the 7th my little sister will be turning 16! In lack of funds, I decided to make something for her that would be just as special! I went to the dollar store and found a little cute basket (her favorite color is green), along with a couple of different types of blank cards with envelopes. I made her some of her own return address labels with a fancy design with some clear Avery labels I purchased from target for my senior show last March. I went to Avery.com and they had an option where you could design and print labels online.
I then made her a homemade card. A while back I saw a tutorial on drawing with chocolate and I decided to try it out. Here are the directions. I chose to do a panda because that is my sister's nickname. Amanda = Panda... our little cousin couldn't pronounce her name so he just started calling her Panda. I put a popsicle stick in one of them right as I was doing the white chocolate layer. By the way, I just used some white and brown chocolate chips to make this. Simple, Simple and so much fun! I made some flowers to go with it too!


I then made her a homemade card. A while back I saw a tutorial on drawing with chocolate and I decided to try it out. Here are the directions. I chose to do a panda because that is my sister's nickname. Amanda = Panda... our little cousin couldn't pronounce her name so he just started calling her Panda. I put a popsicle stick in one of them right as I was doing the white chocolate layer. By the way, I just used some white and brown chocolate chips to make this. Simple, Simple and so much fun! I made some flowers to go with it too!


Wednesday, June 29, 2011
Mosaic Yoshi
Thanks to my cooperating teacher and her creative projects working with these itty bitty mosaics tiles with cd cases. I was able to create my own mosaic. Boyfriend really likes the 8-bit characters from the originals Mario games. So, I made him a mosaic Yoshi. He LOVES it. I didn't use a cd case for mine, so I need to go find a frame for it.


Tuesday, June 28, 2011
Mini Pies (Updated)
I have been in a dehydrating fruit mania.. bananas, 6 different kinds of apples, watermelon, strawberries. Currently in the dehydrator: Golden Delicious Apples, Bananas, and Pinneapple.
Currently in the oven: Minni Apple Pies!

I found the recipe here while I was stumbling. The recipe didn't really blow my mind. I would suggest possibly using your own apple pie recipe. The recipe calls for making 6 pies in your cupcake pan. I have one for 12 cupcakes and I was able to make 5. So, you may have to alter the recipe a bit. I also used golden delicious apples instead. I think this would be fun to try with different fillings. :)
I tried this again today with a new recipe I got from a friend of mine for the filling. This made 6 mini pies.
Crust:
2 Cups Flour
12 Tbsp Softened Salted Butter
4 Tbsp Cold Water
Mix together flour and butter until you have small chunks. Add water and mix together into a ball. Wrap in plastic wrap for 20-30 minutes.
Filling:
4 Cups Granny Smith Apples (sliced thin)
1/2 Cup Brown Sugar
3/4 tsp Cinnamon
2 Tbsp Flour (or 1/8 cup)
1 Tbsp Lemon Juice
Mix together brown sugar, cinnamon, flour, and lemon juice. Peel apples and slice thin (I used a mandolin). Then mix together.
Grease a muffin pan, I used baking spray. Use rolling pin to roll out crust on a lightly floured surface. I used a bowl to cut around the shape. Take your crust and place it in the muffin pan. Score the bottom of the crust. Then place your apple filling mixture inside, make sure it is heaping the apples cook down alot. Then use the same bowl to cut another circle out of the crust for the top. Pinch the bottom layer and top layer of crust together and then score the top.
Placed it in a preheated oven at 375 degrees for 30 minutes. I found out that I had to take them out of the pan right away and cool on a plate, otherwise the mini pie will crumble in the pan after it has cooled. If you run into this problem, stick the pan back in the oven for a few minutes to let them heat up again.
Serve with vanilla ice cream. Delicious!


Wednesday, June 22, 2011
Hand-made Thank-You's
I had my graduation party this past weekend and I decided to make my own Thank-You's instead of buying them. A friend of mine gave me some odds and ends including some really cool scrapbook booking paper that helped me make these cards.
Supplies I used:
Cardstock (Multicolor, mine even have a bit of texture to it)
Scrapbook paper
Glue / Tape
Ruler
Scissors
Envelopes
"Thank You" Stamp & Ink
Cheep white paper for the inside
I basically cut down the cardstock to size to fit the envelope, folded it in half. Cut the scrapbook paper to fit and leave a boarder around the outside. Used more cardstock with enough room to just use the stamp. I used some left over scraps from the card to make a boarder around the "Thank You". On the inside, I used some cheap construction paper from a pack I got at target to have a place to write on the inside.


I then signed the back with my logo. I created this logo a few years ago for a graphic design class. We drew an animal from a hat and then we had to use that animal to create a logo using our initials or our name. I drew an elephant and my initials are A.N.
Wednesday, June 8, 2011
Dale Chihuly Sculpture
With the criteria of teaching the 2nd graders the difference between Geometric and Organic Shapes, we made a sculpture in the likeness of Dale Chihuly, with recycled plastic bottles.
Day 1:
Talked about the differences between Geometric and Organic Shapes, then designed our pop bottles using shapes and patterns.
Day 2:
Talked about the artist, Dale Chihuly and his method of glass blowing. Then the students each painted one bottle.
Day 3:
The students cut their bottles into a spiral shape (leaving the cap on, to help me hot glue them together on a paper towel tube), then made eye-patches to help remind them of the artist's name.
Here's the video!
Friday, June 3, 2011
Oh, hey there Chameleon... I didn't see you.
With all of the excitement of the baby chicks hatching ("Peep! Peep! Peep!", says all of my kindergarteners) and graduation.. we have been talking about chameleons and how they change colors!
Day 1: Talked about patterns, then we painted two sheets of paper with a target pattern.
Day 2: Watched a video about Eric Carle's book "The Mixed-up Chameleon"; folded one of our papers in half and used a tracer to trace and cut out our Chameleons. Then we opened them up and glued them standing up on our other painted paper to blend in.


Day 3: I had my little artists fill out a worksheet for me. I probably would change some things about it, now having done it with 2 classes. But, the students aren't the only ones that are learning. :) At the bottom, I had them draw their own mixed-up chameleon. SUPER cute and creative.
My worksheet:

The beautiful mixed-up chameleons!


Monday, May 30, 2011
Read, Look, & Listen
As the second part of my class period with the monster bookmarks, I talked to the students about what kinds of things we can learn when we read about art. My CT has these very large prints of works of art with the information about the artist and art on the backside. I didn't have them read all of the information, just about the art and artist because there was a lot of information on there for the teacher as well. I passed out a worksheet that looks like this, one for each group:


I explained to them that they will work in groups by tables and had to decide who is going to have what role. I also talked about each role's responsibilities. The writer (writes down all of the information), the leader (keeps everyone on task), the reader (reads the information), and the reporter (talks to the rest of the class about what they learned).
They had a great time with this, I really think they enjoyed working together and still have their own special responsibility.

You can see in the picture, that the students still had out their bookmarks. Some groups were so excited to use them that they put the bookmarks on the corners of their worksheets or the large picture of the artwork. :)
Saturday, May 28, 2011
Monster Bookmarks
I found a tutorial not too long ago about making monster corner bookmarks. I loved the idea and was excited to share it with my cooperating teacher. We thought this would be a great project for the 1st and 2nd graders. She informed me that these students have a reading program for the summer where they get points for so many books/pages read. I started this project with the 2nd graders yesterday and they LOVE them. "It looks like they're eating the book!" -One of my many clever students. :)


I had a station with all of the supplies needed. (Picture to come) The students used a tracer for the body with their choice of 6 different colors, strip to make the eyeballs, irises (6 colors choices again), and teeth.

For the dimensions of the tracer, you can look to the tutorial I found (link found above). I am just showing you the materials that I had set out for the students. They used the strips to cut their own circles for the eyeballs and irises. Then they cut triangles half way through on the smaller white strip to make the teeth.
I had so much fun with these, I can't stop making them. Thank goodness for "Stumble Upon".
Friday, May 27, 2011
Optical Illusions
The fourth graders have completed their Optical Illusions and I have displayed their hard work! They made two final pieces. On their last day, they finished up their drawings and I gave them a demonstration on how to use the die cutter. They loved it! I called the class back by tables to have theirs cut and they were given a chance to help cut their paper into a 3-D cube template. They strung their cubes by yarn. One class I had them glue their cube directly onto the background to blend in with the paper.


I love how it turned out! I got some pretty cool compliments as well. These students should be very proud!


I love how it turned out! I got some pretty cool compliments as well. These students should be very proud!
Friday, May 6, 2011
Video of the Piggy Banks!
Tuesday, April 26, 2011
Google Docs
My C.T. showed me a very cool and very FREE program called Google Docs where you can basically do any "watered-down" version of Microsoft Word, Presentation, Excel... plus much more. I made a presentation on there for my How-to on making the piggy banks. The program is pretty neat at what it can do, so go check it out for yourself!
Wednesday, April 20, 2011
Clay Piggy Banks
As my first lesson at the elementary school, I have been working with the 3rd graders along with the 6th and 7th graders making piggy banks from clay! I'm so excited to see the final results. We set our first round of firing today and I can't wait to get back on Tuesday to see how they turned out! They did such a wonderful job and I love all of the little characteristics each piggy has. I will post pictures of the making of the pigs after they have been glaze fired. I'm getting anxious to show everyone all of their hard work!
During my last demonstration for the 3rd graders, my CT taped it using the doc cam. For student teaching, I am required to tape myself and then review it. I was really nervous about doing it at first, but I am actually very proud of them! I made my first google doc presentation and as soon as I get it finished, I will upload it to share with all of you!
Here is a spoiler of what is to come....

On another note: I have to say, I am really enjoying my time here. I cannot believe that it already almost May. YIKES! I will certainly miss this. :( So, in 19 days I will turn 24... in 23 days, boyfriend will turn 26... and in 24 days I will be walking in my graduation ceremony!!! However, I technically won't be finished until the end of my ST experience in June. So, I have lots of things to look forward to! Hooray Me!
Saturday, April 16, 2011
I can't wait to get back there!
I have to say that I am really, really enjoying my elementary school student teaching experience. I am learning so much and I feel more confident in myself than I ever have. Thursday, my cooperating teacher was at a meeting, so there was a substitute... who was wonderful! He gave me some tips on what has worked for him and also what hasn't. It was great to share stories with him and get some advice. I had a great experience at what it feels like to have a full course load at an elementary school. It was so exhausting, but I felt like I was very prepared and did the best that I could. :) It's also even more exciting when your ideas for lessons come to life... even if it doesn't go exactly as planned. I think I learn more when they don't go right and I can figure out what I am doing wrong. I love it even more when the students get excited. :)
I started a project with the 4th graders; they have been talking about Op Art. I had them doing "Line Designs", in which they would start off with a center line on their paper. Next, they have to make a line that follows the center line. But, the trick is to make that line touch in at least three spots on the center line. Then all of the lines after that follow the second line we made. When that side is done, they flip the paper over and do the same thing on the other side. (I have them turn their papers to avoid smudging) When they first came in, I had them do a couple of practice designs on an artist trading card. They were so focused and working really hard! (that is until we had the severe weather drill) Then, they moved onto the final paper. One student worked so quickly that I challenged him to do another one and make two center lines and he was excited to try it. :)


One of the things that the substitute and I were talking about was how to get the students attention without losing your head or your voice in the process. So, now I'm thinking about what would I do if I actually do lose my voice? What are some non-verbal ways of getting your students attention? One thing that he mentioned was to clap a pattern and have them repeat it, or raising your hand and others will follow suit. So, my question is for anyone to answer... what are some ways of gaining your students attention that have been successful for you?
Thanks,
From the always learning, soon to be art teacher. :)
Friday, April 1, 2011
Well, Well, Well...
... I did not update at all during my last school placement. My apologies. So, here is an update as to what I have been up to the past 9 weeks. I just finished at Elk River High School last week and began my first week at Rogers Elementary. If anyone is interested, I have an album on my Facebook from last quarter at the High School. Here is the link.
I had a fantastic time! I already miss the students and my cooperating teachers. My classes included: Drawing II, AP Art, Clay I (2 sections), and Clay 2. I learned so much and so grateful for everything. I have been back a couple of times since the quarter ended, mostly for grading projects that students were VERY late turning in, but also because I wanted to. :) Right as I was leaving, the art department submitted student work to Paramount in St. Cloud and Mrs. Nestrud emailed me to tell me that their students received 12 awards, including the top two prizes! :D I was so ecstatic at the news, but I didn't want her to tell me who won the awards. I want to be surprised when I go to the reception on April 11th. Luke (my boyfriend) is coming too! :D
Anyways, I will be more attentive to my blog over what's happening at the Elementary School. Or at least attempting to. I know I will have a wonderful time, because it's a great school with great kids and great teachers. Now it is time for me to get back to preparing for next week. I am starting with two lessons! One for 1st grade and the other for 3rd grade. I'm excited to get started! Wish me luck!
Tuesday, January 25, 2011
New Things Are Happening!
So, I start my teaching experience on Friday at the Elk River High School. I am very excited and also very nervous! EEK! I visited the school a couple of weeks ago and I felt very comfortable being there. The cooperating teachers are very nice and helpful. I will be working with two teachers. In the morning I will be teaching Drawing 2, & AP Art with Rana. And in the Afternoon I will have two Clay 1 courses and a Clay 2 course with Damien. My biggest fear: making sure I can explain myself clearly to the students. I haven't always been the smoothest talker. So an achievement for me would over the next few weeks is to present myself as best I can (If I don't, then I need to take it as a learning experience for myself for the next time) and be confident in my actions. My goal as a teacher is to help others learn, not just from my knowledge but also to help them find the information they seek and to be honest with myself and others. I won't always know the answer to everything, but I can say that we(together) can find out. This includes me learning in order to help others learn; Learning together.
I have some ideas for lessons, I hope they go well. :)
Also, I have some other exciting news...
 Yes, that's right. This morning I applied for graduation in May. Yahoo! Soon, I will be in the "real world" looking for a grown up job. :D Exciting and scary!
Also, My mother called me this morning to tell me that I had received a letter in the mail from UW Stout. She opened it to find that I have been given the Chancellor's Award for Outstanding Scholastic Achievement. Meaning, I did really well last semester! :D Hooray!
I am just finishing up my senior show which will be held in March. My group and I have chosen to call it "Unspoken". That term really relates to all of our work equally. I have all of my photos printed, I just need to finish up my drawings.
Well, I am going to go do some more planning and preparation for Friday (AKA.. the beginning of the rest of my life) :D
Cheers.
I have some ideas for lessons, I hope they go well. :)
Also, I have some other exciting news...
Also, My mother called me this morning to tell me that I had received a letter in the mail from UW Stout. She opened it to find that I have been given the Chancellor's Award for Outstanding Scholastic Achievement. Meaning, I did really well last semester! :D Hooray!
I am just finishing up my senior show which will be held in March. My group and I have chosen to call it "Unspoken". That term really relates to all of our work equally. I have all of my photos printed, I just need to finish up my drawings.
Well, I am going to go do some more planning and preparation for Friday (AKA.. the beginning of the rest of my life) :D
Cheers.
Subscribe to:
Posts (Atom)